- Water Testing Meters
- Anemometer
- Length & Distance Meter
- Multimeter & Clamp Meter
- Light and Sound Meter
- Slide Calipers & Screw Gauge
- Thermometer & Hygrometer
- Milk Testing Meters
- Paper, Grain & Wood Testers
- Stopwatch & Timers
- Soil Testing Meters
- Refractometers & Analyzer
- Magnetic Compass
- Tachometer & Megger
- Thickness & Dia-Meters
- Other Meter And Accessories
Microscope and its Uses in Biology Lab

The word microscope comes from the Greece languages ‘Micro’ and ‘skopein’. The microscope is an instrument with the help of which small and micro-objects invisible or dimly visible with bare eyes are magnified and visualized. Here we will discuss the microscope and its uses in Biology Lab.
The ability to make different parts of an object visible is called resolving power. The resolving power of the human eye is typically 0.1 mm. That is, we cannot see objects smaller than 0.1 mm with our bare eyes. There are different types of microscopes invented in the world. Such as –
- Simple Microscope
- Compound Microscope
- Binocular Microscope
- Stereoscopic Microscope
- Zoomscope Microscope
- Ultraviolet Microscope
- Florence Microscope
- Durk Filed Microscope
- Fase Contrast Microscope
- Polarising Microscope
- X-Ray Microscope
- Electronic Microscope
The Microscope and its Uses in Biological Laboratory are mentioned below:
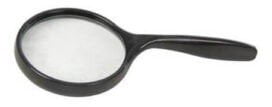
(A) Hand Lens or Magnifying Glass or Magnifier Lens:
A magnifying glass is a common magnifying lab instrument. Here a biconvex lens is mounted in a frame. Depending on the magnification of the lens, an object can be magnified from two to ten times (2x-10x). By placing the lens on the specimen and bringing the eye closer, an object is magnified in the presence of light.
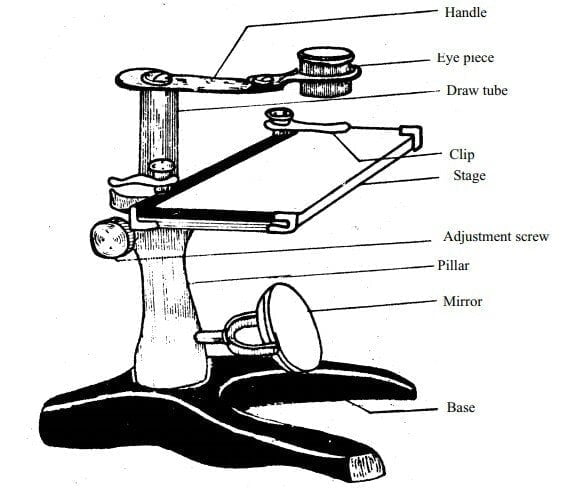
(B) Simple Microscope
Structure of a Simple Microscope:
The structure of such a microscope is very simple. It usually makes a target appear 10-20 times larger. Simple binoculars are used to clearly observe objects that are invisible to the bare eye. This microscope is also used to dissect any part of the body.
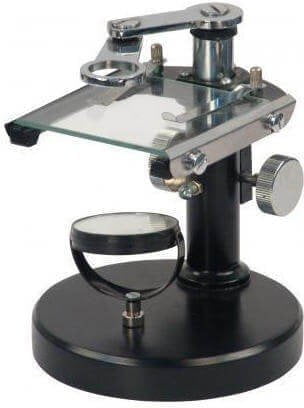
It consists of the following parts:
i. Base: The lower part of the machine is called the base of the microscope. Above it rests other parts.
ii. Pillar: It is a columnar segment perpendicular to the footing.
iii. Stage: It is a rectangular plate attached to the pillar. At its center is the target. There are clips on both sides of the stage. Slides are held in place with clips.
iv. Mirror: It features a rotating mirror attached to the pillar below the stage. This allows the light beam to be reflected through the target on the stage.
v. Adjustment Screw: It is located at the back of the pillar. Through this, the lens can be moved up and down.
vi. Arm: It is located parallel to the stage. At the forefront are the eyepieces.
vii. Eye Piece: It is a lens and can be of different powers (eg – 10x, 15x, 20x.).
Uses of a Simple Microscope:
The noted object must be temporarily mounted on a glass slide and clipped to the center of the stage. Then with the help of the mirror, the light beam has to be reflected on the stage. Turn the handle to place the eyepieces directly above the object of interest. Note that the object must be placed in proper focus by tuning the adjustable screw-up and down.
A simple microscope can usually be used to observe the external structure of a sample. The instrument is also used for dissecting any specimen like forceps, needles, etc.
The diameter of plant cells is usually 0.2 um to 50 um (1000um = 1 mm). But the human eye cannot see anything smaller than 100um, even if two objects in 100um appear as one. Because of this, the microscope has become an indispensable tool in the biology laboratory.
(D) Compound Microscope
A compound microscope is a biological microscope that uses multiple lenses to enlarge the object of a sample. Typically, a compound microscope is used for viewing samples at high magnification (25x – 625x), which is achieved by the combined effect of two sets of lenses: the ocular lens (in the eyepiece) and the objective lenses (close to the sample).
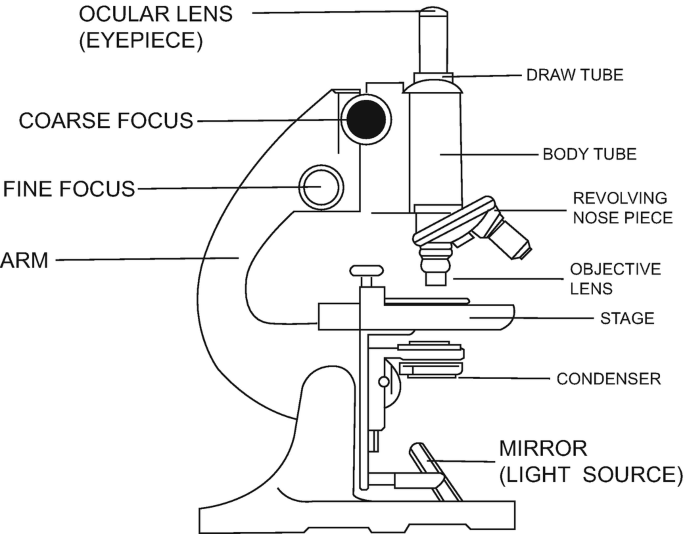
Parts of a Compound Microscope
Base, Pillar, Arm, Stage, Body Tube, Draw-Tube, Coarse & Fine adjustment screw, Nose Piece, Fine Focus, Condenser, Diaphragm, Eyepiece, Objective (5x, 10x, 45x), and Mirror for Light Sourcing,
Methods of using the compound microscope:
- The compound microscope should be placed on a table in a well-lighting area.
- Clean the eyepiece, objective lens, and mirror glass with a clean cloth.
- The objective should be rotated slowly while keeping an eye on the eyepiece. When the objective comes perpendicular to the hole in the stage, there will be a clicking sound. The objective should be kept in that position.
- The specimen covered with coverslips on the slide should be placed on the stage in such a way that the part covered by the coverslip is just below the objective lens and just above the aperture of the stage. The slide should be clamped well with clips on both sides to keep it stable.
- Now, keeping the eye on the actor, the concave side of the mirror should be turned towards the light source so that the light rays are reflected and fall brightly through the apertures of the diaphragm, retractor, and coverslip of the stage.
- Turn the coarse insertion screw to bring the objective very close to the slide (about half an inch above the slide) and slowly move the objective up and down by turning that screw, and suddenly the specimen placed on the slide becomes clear. This method is called focusing. Now turn the fine insert screw to see the object clear and clean.
- The microscopes used in our schools and colleges are monoculars. Therefore, while using them, both eyes should be opened and one eye should be seen through the eyepiece. It is sometimes necessary to switch eyes to watch actors to avoid eye strain.
